The Macro Scheduler presented here works on Mac OS X and does not requires you to learn any Scripting Language. All you need to do is create a Macro on your Mac is to actually do it. Two distinct ways to record macro on your Mac are presented below. You can even combine both macros to let your Mac OS X do whatever you want it to do. Appropriate Screenshots have been provided below and Video Tutorials have been posted below as well. The screenshots and video tutorials provided have been captured on Mac OS X 10.9 and yes the Macro Applications do work on other Mac OS X Versions. When you are satisfied with the Macro Applications presented below, you can proceed ahead and download the appropriate software and try it yourself.

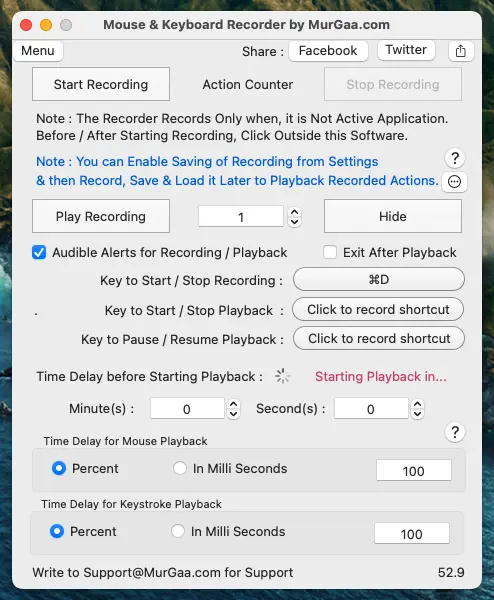
Using a Macro Scheduler requires basically two steps. First step is to record the Macro and the second step is to schedule the recorded Macro and let it play the recorded actions at scheduled date time. Now selection of Macro Recorder depends on what actions you wish to automate. In case the actions you wish to automate produce pre-defined results, you can use the Macro Recorder for Mac and record the Mouse and Keyboard Actions. The Video Tutorial of Macro Recorder for Mac displays Mouse and Keyboard Actions recorded and played back. Once you have recorded your desired Macro, you can schedule it to play after configurable time duration. Note in the above screenshot, once the Play Recording button is clicked, a Timer will start and will effectively start playing the recorded Mouse and Keyboard Actions after 30 Minutes. Also note that the recorded Macro will be played 5 times as configured in the Mouse and Keyboard Recorder for Mac.
In case the Macro you wish to schedule needs input from keyboard, then you would need to enable access for Assistive Devices. In order to protect privacy and prevent spy applications like keylogger, Apple’s Macintosh allows you to control whether Mac Applications do have access to record your Keystrokes or Not. The Macro Recorder for Mac displays the steps required for Enable Access for Assistive devices on Mac OS X 10.9 and explains the procedure in details for 10.9 and other Mac OS X versions.

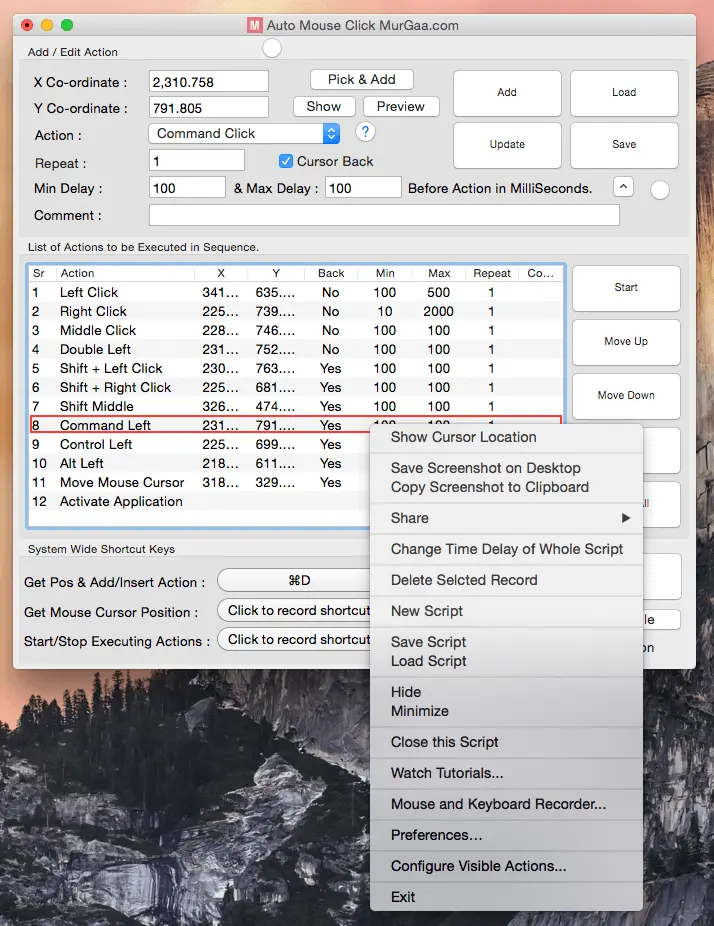
The above screenshot displays a Macro Editor which allows you to Add / Edit Macro Actions . Once you have added the desired Macro Actions, you can save them to your Hard Disk and execute them later. You can also use the Macro Editor for Mac to start executing the Macro created with above Macro Editor for Mac at a later date / time. Scheduling your Macros with software applications presented above requires careful planning and yes to others it would look like a Ghost is running your Mac OS X by moving your Mouse and doing Keyboard Typing.
Whenever scheduling a Macro, always take care of Screen conditions as the method presented above to schedule Macros is sort of blind automation where the Macro Applications will do exactly what they have been asked to do, but they will not be able to understand the outcome of the Actions. On contrary appropriate planning of Macros with above Mac OS X Automation Utilities can provide you the best and easiest way to schedule your Macro. You can even take the help of Mac OS X Automator to schedule or automate tasks which are not supported by above Macro Applications for Mac OS X. The best way to start with any of the above Macro Scheduler is to Download and try it with some basic actions on Desktop, Finder or even Text Edit as displayed in the Video Tutorial for the Macro Recorder presented above. Once you are happy with any of the above Macro Scheduler, proceed ahead and do another test and finally let it do the actual Mac OS X Automation you want it to do.